

In the previous article, I have talked about some of the most important tools you will need to use when working on Data Science projects including Git widgets in VS Code. In this article, we will demystify the tool Git which allow the versioning of your code along with the handling of collaborative repositories.
The summary is as follows:
- Git & GitHub/GitLab
- Your 1st repository
- Pushing and Pulling code
- Git project Philosophy
- CI-CD with GitLab
Git & Github
Git is a coding tool used mainly for three reasons:
- Time versioning your code
- Keeping track of the changes made
- Allowing parallel collaborations of multiple parts
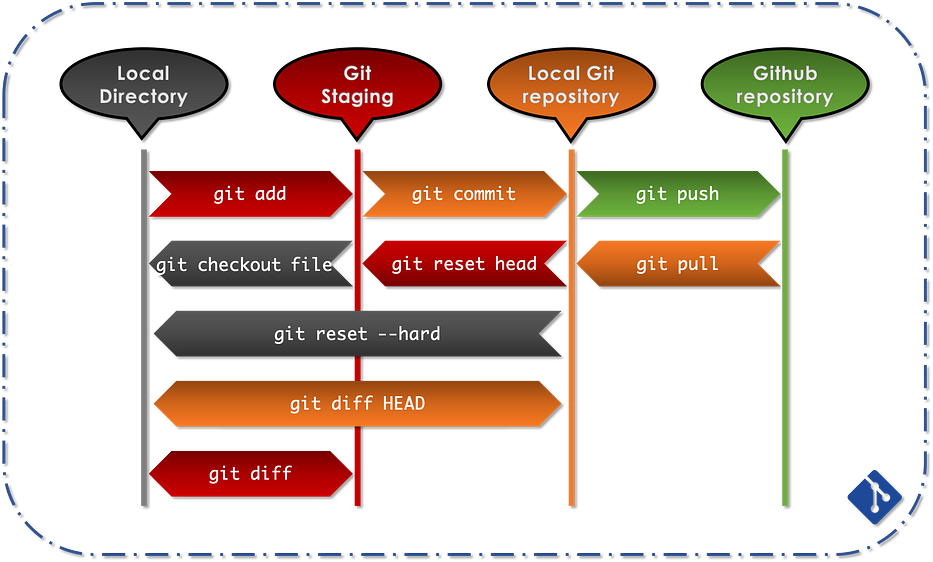
To do so, git works in three stages:
Working directory: is the local folder hosting all the file of your project, more specifically, it is the folder where git was initializedStaging directory: it notes and indexes each modified documentGit local repository: each carried-out changes lead to a version of the document or a snapshot which can be taken and labeled using a message.
Before digging into the command-lines of git let’s first see how to install and configure it.
Installing Git
- Windows: download the Windows Git installer from the following website
- Mac: most versions of MacOs have already git installed.
Configuration Git
As mentioned before, git is a versioning and collaboration tool, hence it is important to know the people working on each file of the project, this is why you should configure your git using your name and your mail:
git config --global user.name "Name"
git config --global user.mail "mail"
Your 1st repository
Creating your first Git repo
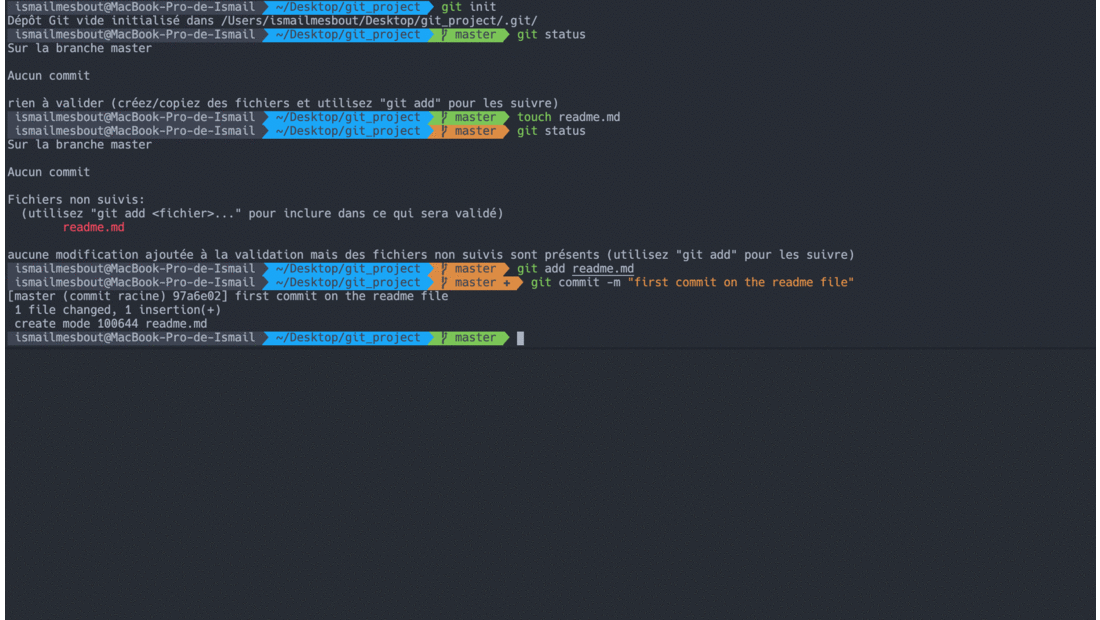
Once you have installed and configured git, you can create your first git project using the following command-lines:
mkdir projectFolder
cd projectFolder
git init #initialize git on your project
git status
touch file.md # create new file
open file.md # open the file and modify it
git status # file untracked -> add it to git index
git add file.md
git commit -m "file.md modified ..."
In the next paragraph, you will find the graph summing up the relationships between the different stages.
Hosting your repository on GitHub/GitLab
Github or GitLab are platforms that allow hosting your project and coordinate multi-party collaboration. The following steps detail how you can do so:
- Create an account in GitHub/GitLab
- Create new Repository
- Copy its link
- Clone it in a folder on your computer
- Make all the necessary changes assigned to their commits
- Push the changes to GitHub/GitLab
NB1: The four first steps are carried-out only once while the 5th and 6th are iterative (see next paragraph). NB2: It is also possible to push an existing folder into the github directory using:
git remote add origin gitAdress git branch -M master git push -u origin master
Pushing and Pulling code
Once you have done all the changes, you would want to share your work to the GitHub/GitLab repository in order to make it accessible to the other members of your team. Below are the necessary steps to follow:
- Modify the file on your computer
- Run:
git add file.extension #Add it to the git index:
git commit -m "message" #Commit the changes
git push #Push the changes to github
You would also want to get the latest changes done by the others by using the following command-line:
git pullThe following graph represents the connection between the local repository and the GitHub/GitLab one.
NB: When pushing or pulling from GitHub/GitLab your credentials are to be filled in.
Illustration
In the following GIF, I will create a local folder in which I will initiate a git versioning and also create a file called README.md and then add and commit the changes. Later on, I will create a Github repo to which I will push the local folder and check if Github got updated:
Collaboration
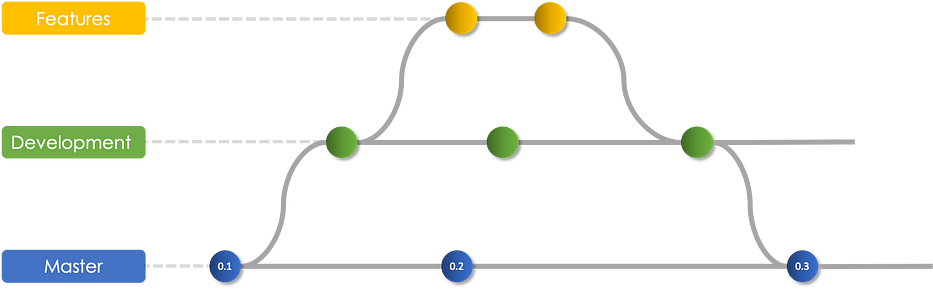
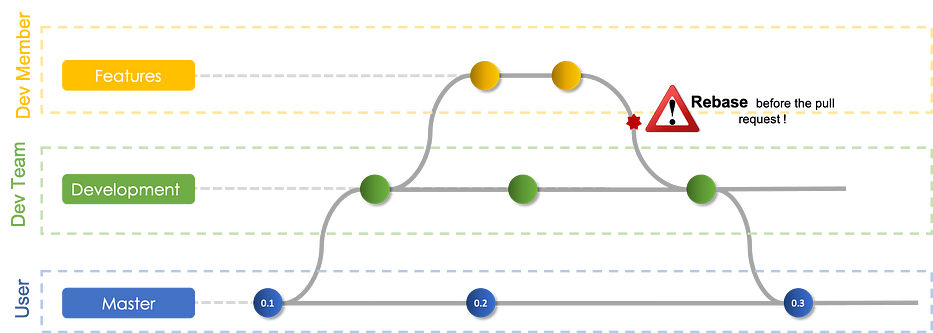
When working on a complex project, each member of the team is usually assigned to a task or a feature on which he or she can work independently. With that being said, each project can be seen as multiple subprojects handled by different members.
In order to coordinate their work, git uses the notion of branches: the main one is called master and other branches can be merged into it once the work on them is stabilized. Branches can also be used to separate the production version from the development one, in which new features are constantly developed, hence the name. Here is a smart workflow to combine both:
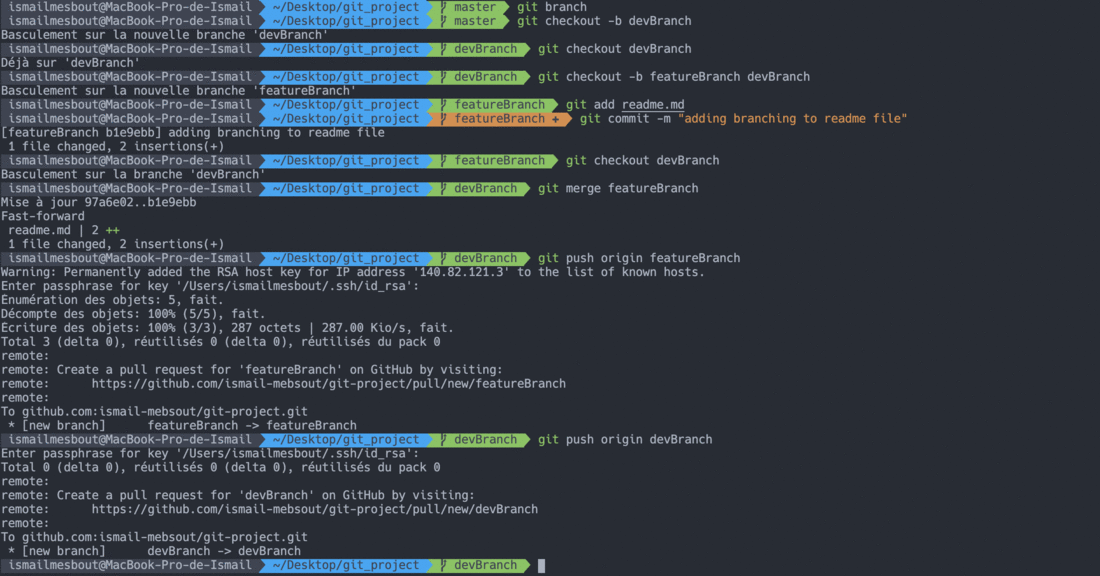
To do so, you can use the following bash script, once you are in the git repository:
git branch # get current branch (master)

git checkout -b devBranch # create and switch to development branch

git checkout -b featureBranch devBranch # Create feature branch over the development branch
git add file.extension # Add changed file to staging
git commit -m "message" # commit the message

git checkout devBranch # switch back to development branch
git merge featureBranch # merge featureBranch into devBranch

git push origin featureBranch # push the changes on featureBranch to github/gitlab
git push origin devBranch # push the changes on devBranch to github/gitlab
He is an illustration of branching and merging using the previous project:
When merging branches, some conflicts might occur, especially when two persons worked on the same file, in this case, you should
- Open the file raising the conflicts
- Resolve the conflicts (Use VSCode for example)
- run:
git add .git commit -m "message"NB 1: branches can also be seen as a way to contribute to an open-source projects, i.e their code is publically published on GitHub/GitLab.
NB 2: You might want to set a SSH the connection between your machine and your GitHub/GitLab repository in order to make your collaboration more fluid.
Ignoring file
In some situation, certain files should be kept in local, in this case the relative path of these files should be added to the .gitignore file which is automatically created when git was initiated. Github and Gitlab are mainly made to handle store code, hence it makes no sense to send databases or Deep Learning weights to them, their paths are usually added to.gitignore file.
WEIGHTS_DIR/ #ignoring the folder of DL weights
DATA_DIR/ # ignoring the folder of data
CheatTable
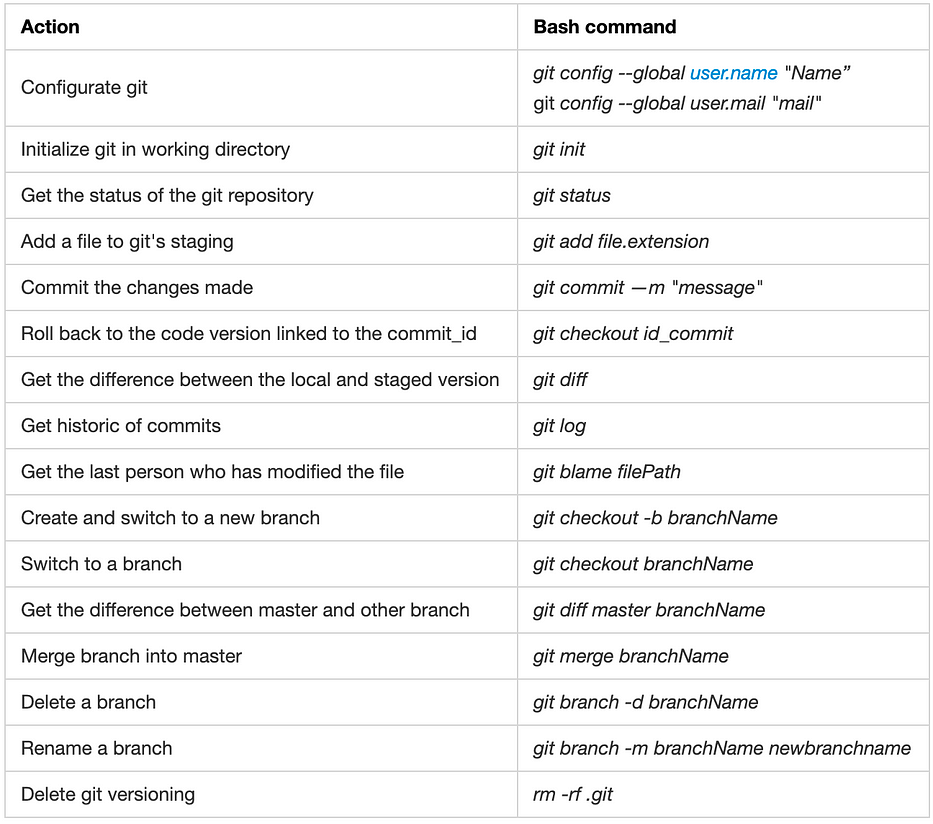
As a gentle reminder, there are two ways to handle your git versioning in VS Code: either through Gitlens or through your installed terminal. For more details, feel free to visit the official documentation of git.
Git project Philosophy
When working on a project, say an app, for example, it is of good holding to consider three levels of coding/branching:
Master branch: or main branch hosts the version of code that is used by the daily users of the app (only for releases)Dev branch: used to host the new developments and features planned for the appFeature branch: is created each time a new feature is being developed
NB: If the dev branch is stabilized, you can mirror it on another branch which can be used by the app testers, in a UAT phase for instance, in order to try the new features and eventually report bugs.
Major Guidelines
Given the workflow described above, here are some important things to keep in mind:
Master branch:
- Never commit in local master!
- Keep the master branch protected!
Dev branch:
- Never commit in local dev!
- Keep the branch dev protected!
Feature branch:
- Always push your work on your remote branch even if it is not finished!
- When collaborating on the same branch, avoid working on the same file or function!
- Check the status every time before stagging:
git status - Always check if you have the recent version of dev code
Working on a new feature
i.e create a new branch from dev branch:
- Check if in dev branch:
git branch- If so:
git --rebase origin/dev #Check if you are up-to-date
git checkout -b branchName- If not:
git checkout dev
git --rebase origin/dev
git checkout -b branchName
2. Make your changes, add and commit them
3. Push your work to your remote branch:
git push --set-upstream origin branchName4. Make sure your branch is up-to-date in regard to dev:
git checkout branchName
git pull --rebase origin/dev
Resolve conflicts in there are any:
git add path_to_resolved_file
git commit -m "message"
git push #sends automatically to your remote branch
5. Create a Pull Request in GitHub/Gitlab and assign a reviewer
NB: Rebase is another merging technic that keeps your logs cleaner
We can sum up the git flow described above in the following figure:
When the merging is carried out, you will need to make sure that the app is working perfectly and that there are no regressions compared to the previous version, by running automatic testing. And that is why you need CI/CD!
CI-CD with GitLab
CI/CD stands for Continuous Integration and Continuous Delivery/Deployment. It is a technical approach that allows automating the process of apps development by running tests that check if
- New features work as expected
- There are no regressions on the old ones
Gitlab offers this option, which is linked to each project and provides runners or processes that pick up and execute CI/CD jobs.
The CI/CD pipeline is developed following 3 major steps:
- Install & Registering GitLab Runners
- Creating, in local, a yml file detailing the jobs/tests to conduct
- Pushing the jobs to Gitlab
1. GitLab Runners
As mentioned before, runners are processes used to execute pre-defined tests. There are 3 kinds:
- Shared runners are available to all groups and projects in a GitLab instance.
- Group runners are available to all projects and subgroups in a group.
- Specific runners are associated with specific projects.
In this exercise, we will deep dive into the specific runners which are used for one project at a time, To set up the specific runner manually, we first need to install GitLab Runner. To do so, on MacOS for instance, we can use brew:
brew install gitlab-runner #Install GitLab Runner
brew services start gitlab-runner # Install GitLab Runner as a service and start it.
Once we have installed the runner, we will need to register it to the project by running the following command:
gitlab-runner registerWe then need to enter the following information:
- The GitLab instance URL: very often https://gitlab.com/
- The registration token: found in Repository > Settings > Runners
- Description for the runner: a short description of the runner
- Tags associated with the runner
- Executor: Many options to consider(Docker, ssh, shell…)
2. YML file
In order to use the CI/CD services of GitLab, you will need to host your project on the platform and have a YAML file at its root called .gitlab-ci.yml which hosts the CD/CD configuration.
The scripts are grouped into jobs, and jobs run as part of a larger pipeline. You can group multiple independent jobs into stages that run in a defined order. The tags are used to select a runner.
variables:
  GIT_DEPTH: 1 #Shallows cloning: Last commit for each file of the project

stages:
  - build
  - test
  #- deploy

install-dependencies: #Job 1
  stage: build
  tags:
    - python
  script:
    - echo "Install dependencies"
    - conda install environment.yml

linting: #Job 2
  stage: test
  tags:
    - python
  script:
    - echo "check linting"
    - pylint

unit-tests: #Job 3
  stage: test
  tags:
    - python
  script:
    - echo "unit tests"

integration-test: #Job 4
  stage: test
  tags:
    - python
  script:
    - echo "Integration tests"
Before pushing your file to GitLab you can first check its syntax and validate its configuration on CI Lint.
3. Pipeline on GitLab
As seen in the yml file, the configuration of the CI/CD consists of running different jobs that belong to different stages cited in chronological order: build, test and deploy. Jobs in the same stage run in parallel while jobs in the next stage run after the jobs from the previous stage complete successfully. In each push to GitLab the jobs are executed and the merge request is passed once all the jobs were successfully computed. You can follow the execution by checking the CI/CD Pipelines:

NB: You can use separate yml files for the master and dev branches if the testing is not similar.
Conclusion
Git is a very powerful tool that is worldwide used in practically every app, especially the ones with multi-developing teams, hence the need to MASTER the technology in order to have a sustainable and robust developing pipeline allowing fast and better collaboration.
.svg)
.svg)
.svg)